Most Nest thermostat wiring issues come down to a couple of usual suspects: a lack of consistent power, often from a missing C-wire, or simple connection mistakes right at the thermostat base. The symptoms are pretty classic, too—you might see the thermostat randomly losing power, flashing a "delayed" message, or your HVAC system just starts acting weird.
Troubleshooting always starts with turning off the power and giving the wires a good, close look to make sure everything is snug.
Your First Steps in Diagnosing Wiring Problems
Before you start tearing things apart or getting lost in complex troubleshooting, a quick, methodical check can often solve the problem in minutes. This whole process is about safety and smart observation. If you rush ahead, you risk turning a small hiccup into a much bigger headache. Let's rule out the easy stuff first.

Prioritize Safety Above All Else
This is the one step you can't skip: turn off the power to your HVAC system at the circuit breaker. It’s the only way to protect yourself from a nasty shock and prevent an accidental short that could fry the sensitive electronics in your Nest and your furnace.
Don't just assume it's off. Go to the breaker box and flip the switch yourself.
Perform a Thorough Visual Inspection
With the power confirmed off, gently pull the Nest display off its base to reveal the wiring terminals. Now, just take a moment and look closely at each connection.
- Loose Wires: Is every single wire pushed firmly into its terminal? A wire that’s wiggled its way out is an incredibly common reason for a system to stop working.
- Frayed or Damaged Insulation: Check for any nicks, bare spots, or damage on the wire jackets, especially right where they connect. Exposed copper can cause shorts.
- Signs of Corrosion: See any green or white gunk on the wire ends or the terminals? That buildup can stop a solid electrical connection from forming.
I can't tell you how many times the fix is as simple as a wire not being seated correctly. Give each wire a gentle tug to make sure it's secure. This five-second check has saved countless homeowners from hours of unnecessary frustration.
Check for Diagnostic Error Codes
Before you pulled the display off, did you happen to see any error codes on the screen? Those codes are your best clues. An N260 error, for instance, points directly to a power problem, which almost always leads back to the C-wire.
If your thermostat keeps going offline or is super slow to respond, it’s probably struggling to keep its battery charged—another tell-tale sign of a wiring issue. And if the thermostat just isn't hitting the temperature you set, it could be a wiring mix-up or a deeper problem with your system. You can read more about that in our guide: https://4neighborhood.com/thermostat-not-reaching-set-temperature/
For those who want to dig a little deeper, a multimeter is your best friend. Learning to test continuity with a multimeter can help you find breaks in a wire that you’d never be able to see. This initial once-over will help you get a handle on the problem and figure out what to do next.
Decoding Your Thermostat Wires
Let’s be honest, popping the cover off your old thermostat can feel like you’re about to defuse a bomb. That jumble of colored wires is intimidating, but figuring out what they do is the single most important step in solving Nest thermostat wiring issues. Think of it as learning the language your HVAC system speaks—once you know the basics, the whole process becomes much clearer.
Before you touch a single screw or disconnect anything, pull out your phone and take a clear, well-lit picture of the existing connections. Seriously, don’t skip this. This photo is your ultimate safety net and will save you from a world of frustration later.
The Main Players in HVAC Wiring
While the colors are a good guide, they aren't always consistent from one house to the next. The letter on the terminal where the wire connects is what really matters.
Here’s a quick rundown of the wires you’ll almost certainly find:
- R Wire (Power): Almost always red, this is the 24-volt power source coming from your system's transformer. You might see Rh (power for heat) and Rc (power for cooling). If you have both, it just means you have separate transformers for your furnace and AC.
- W Wire (Heat): This is typically a white wire, and its job is simple: it tells your furnace to kick on.
- Y Wire (Cooling): Usually yellow, this wire is the one that activates your air conditioner's compressor to start cooling things down.
- G Wire (Fan): The green wire controls the blower fan, allowing you to run it independently to circulate air even when the heat or AC isn't active.
To make things even easier, here’s a quick-reference table that breaks down what each wire terminal and its corresponding color usually does.
Common Thermostat Wire Functions
| Wire Terminal | Common Wire Color | Primary Function |
|---|---|---|
| R (or Rh/Rc) | Red | Provides 24V power to the system |
| W (or W1) | White | Activates the heating system |
| Y (or Y1) | Yellow | Activates the air conditioning system |
| G | Green | Controls the indoor blower fan |
| C | Blue or Black | Provides continuous power (Common wire) |
| O/B | Orange or Dark Blue | Controls the reversing valve for heat pumps |
Keep this handy as you work, but always remember your initial photo is the ultimate source of truth for your specific system.
The C-Wire: The Source of So Many Problems
Now, let's talk about the most notorious wire of them all: the C-wire, or "common" wire. It’s often blue or black, and its only job is to provide a continuous 24V power path so the Nest can keep its battery charged without messing with your HVAC system.
Without a C-wire, the Nest has to resort to "power stealing"—briefly pulsing your HVAC equipment just to sip a little electricity. This is what causes all sorts of headaches, like frequent Wi-Fi disconnects, slow operation, or even a completely dead thermostat. If you want a deeper dive, this smart thermostat installation guide does a great job explaining how different systems handle this critical connection.
In older homes, it's pretty common to find an unused C-wire tucked back inside the wall. It’s always worth gently pulling the wire bundle out a bit further to check before you assume you don't have one.
Wires for More Complex Systems
If you have a more advanced setup, like a heat pump, you’ll probably see a few extra wires.
An O/B wire (often orange or dark blue) is what controls the reversing valve on a heat pump, which is the part that switches the system between heating and cooling. Getting this wire in the wrong terminal is a classic DIY mistake that leads to your AC blowing hot air in July. Trust me, it’s a frequent source of trouble calls for installers.
Solving the Notorious C-Wire Problem
If your Nest thermostat is acting possessed—frequently disconnecting from Wi-Fi, showing a "delayed" message, or just dying altogether—the root cause is almost always a power issue. And nine times out of ten, that power issue comes down to one thing: the C-wire, or "common wire."
This single wire is the source of the most common Nest thermostat headaches I see in the field. Understanding its job is the key to getting your smart thermostat to behave.
The C-wire's job is simple: it completes the circuit, giving the thermostat a continuous stream of 24V power from your HVAC system. This lets the Nest keep its battery charged and its Wi-Fi radio on without messing with your heating or cooling cycles.
Without a C-wire, the Nest has to resort to a clever but often flaky trick called "power stealing." It briefly pulses your furnace or AC just to sip a tiny bit of electricity. This method often fails, especially in Minnesota homes where the heat or AC might not run for long stretches. The absence of a C-wire affects up to 60% of homes built before 2000, and in these older homes, the power-stealing hack can drain the Nest's battery in just a few days. You can learn more about Nest power requirements straight from Google's documentation.
Finding a Hidden C-Wire
Before you start worrying about complex fixes, there's a good chance an unused C-wire is already tucked away inside your wall. Installers often run thermostat cables with extra, unused wires just in case.
Gently pull the bundle of wires out from the wall an inch or two. Look for a wire (often blue or black) that’s neatly wrapped around the main cable and wasn't connected to your old thermostat. If you find one, you've hit the jackpot. You'll just need to connect this wire to the "C" terminal on both the Nest base and your furnace control board.
This decision tree infographic can help you figure out what you're working with.
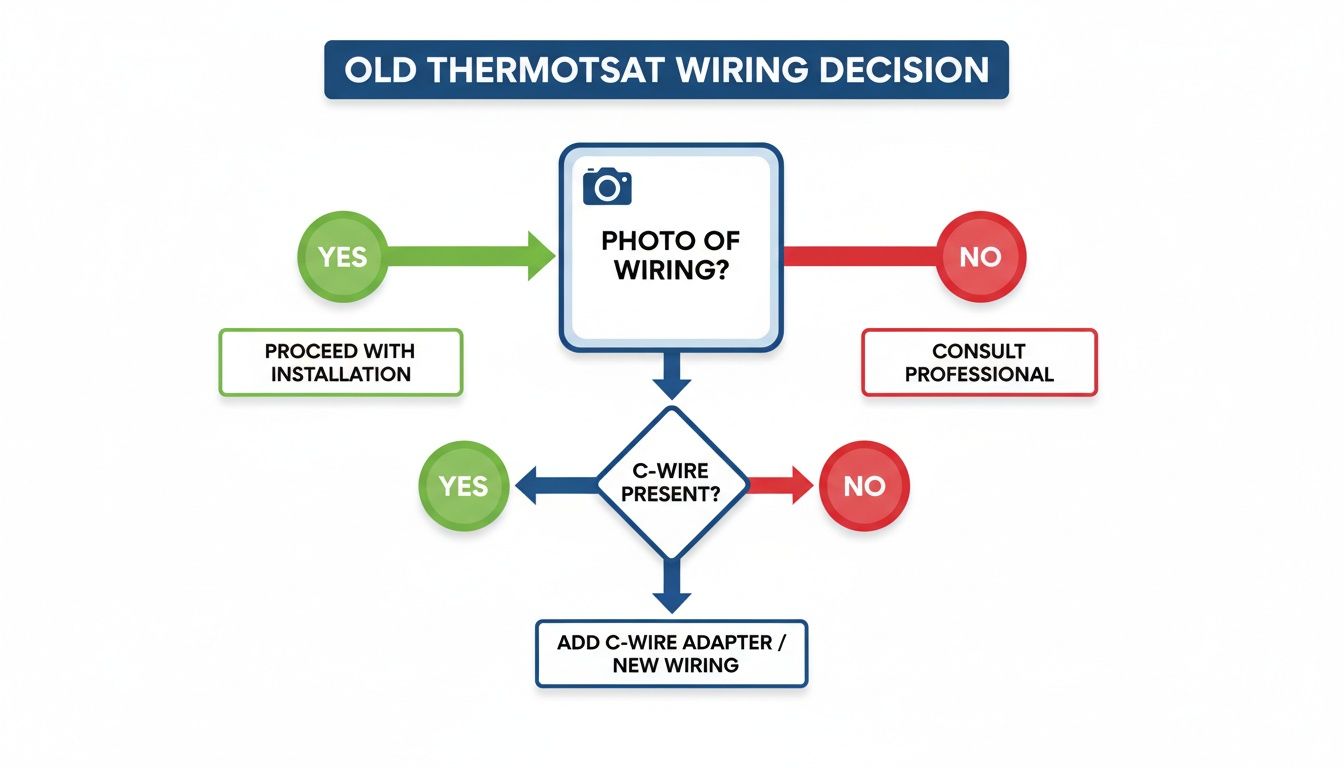
The most important takeaway here? Always, always take a photo of your original wiring before you disconnect anything. It's your best friend during this process.
Solutions When You Don't Have a C-Wire
If you've searched and there's definitely no spare wire, don't worry. You still have a few excellent options to give your Nest the constant power it craves.
- Nest Power Connector: This is Google's official answer to the problem. It's a small adapter that you install at your furnace or air handler. It cleverly uses your existing wires to create that common connection, so you don't have to run a new wire through the walls.
- "Add-a-Wire" Kits: Products like the Venstar Add-A-Wire do something similar. They essentially let you split one of your existing wires to carry two signals, which frees up another wire to be repurposed as your new C-wire.
A common mistake I see people make is using the "G" (fan) wire as a substitute C-wire. While it can technically work, this workaround means you lose independent control of your system's fan—a feature many homeowners rely on for circulating air. I'd avoid it if you can.
While these adapters are great, installing them means you'll be working directly with the control board on your HVAC unit. If opening up your furnace and messing with its wiring sounds a little out of your comfort zone, it's the perfect time to call in a professional. Exploring how to decide if you should install a new thermostat yourself can help you figure out if this is a job for you.
Ultimately, a stable power supply is the definitive fix for almost all of the most frustrating Nest thermostat wiring issues.
Alright, so you've confirmed your Nest thermostat is getting power, but your HVAC system is still acting up. This is a super common scenario. The thermostat lights up and looks fine, but maybe your AC is blowing hot air, or the fan just won't quit. It’s frustrating, but the good news is these weird glitches often trace back to a simple wire in the wrong place.
Most of the time, fixing these issues is just a matter of figuring out which wire is the troublemaker and getting it seated in the right terminal. Let's walk through some of the classic system misbehaviors I see on service calls all the time.
Heat Runs When You Want AC
This one’s a classic, especially if you have a heat pump. You turn on the AC, expecting a blast of cold air, but instead, things start getting toasty. If this is happening to you, the problem is almost certainly your O/B wire. This little wire is in charge of the reversing valve, which is what tells your heat pump to switch between heating and cooling.
- The Fix: When you first set up your Nest, the app asks whether that O/B wire should get power when you call for heat (the 'B' setting) or when you call for cool (the 'O' setting). Most brands, like Rheem and Trane, use the 'O' setting. If you picked the wrong one during setup, your system will do the exact opposite of what you want. The fix is easy—just dive into your Nest’s equipment settings and flip the O/B orientation.
One of my most frequent service calls is for a misconfigured O/B wire. Homeowners are often convinced their new thermostat is broken, but it’s just a one-click settings change that takes less than a minute to fix.
The Fan Runs Constantly
Another one I hear a lot: the blower fan runs 24/7, even when the heat or AC is off. This points directly to an issue with the G-wire, which has one job and one job only: controlling the fan.
First thing to check is the connection itself. A loose G-wire can sometimes make intermittent contact and cause this, so give it a little push to make sure it's firmly in its terminal. More often than not, though, this is a simple settings issue. Pop open the Nest app and check your fan schedule or "Circulate Air" settings. It's easy to accidentally tell it to run all the time without realizing it.
The Hidden Problem of Improper Wire Gauge
Sometimes, you can stare at the wiring until your eyes cross, and everything looks perfect—but the system still acts up intermittently. This could be a sneaky but critical issue: the wire itself is the wrong type. Some older homes have thermostat wires that are thin and flimsy, looking more like old telephone or speaker wire than proper HVAC wiring.
Industry data shows that using undersized wiring is a major source of nest thermostat wiring issues, particularly in older homes. In fact, improper wire gauge plagues 15-25% of some Nest thermostat installations, because those thin cables can cause voltage drops and connection failures. Google Nest specifically calls for solid 18-22 AWG wires for a reason. They provide the stable, low-voltage signal the thermostat needs to work reliably. If your system randomly fails heat tests or just won't respond, the wiring itself might be the culprit. You can read more about compatibility and wire gauge issues from other users who've run into this exact problem.
Knowing When to Call a Professional
Tackling a DIY project feels great, but knowing your limits is even more important—especially when you're dealing with your home’s HVAC system. While many Nest thermostat wiring issues are simple fixes, some situations are clear signals that it’s time to put down the tools and call in a licensed professional.
Pushing forward without the right expertise can quickly turn a minor annoyance into a costly system failure or, worse, a serious safety risk.
Recognizing these red flags isn't about giving up; it’s about protecting your investment and your family. If your troubleshooting leads you down any of these paths, it’s a definite sign to get professional help.
When the Problem Is Beyond the Wall
Sometimes, the issue isn't at the thermostat at all. If you suspect the problem lies with the HVAC control board inside your furnace or air handler, it’s best to stop right there. That board is the brain of your entire system, and one simple mistake can damage sensitive components, leading to a no-heat or no-cool emergency.
A professional technician can safely diagnose issues right at the source. They have the tools to test transformers, relays, and fuses without putting the system in jeopardy.
An experienced HVAC technician can often diagnose a control board issue in minutes—something that could take a homeowner hours of frustrating, and potentially dangerous, guesswork. It's the difference between a quick, targeted repair and accidentally causing a much larger problem.
Signs It's Time for Professional Help
Certain tasks just require specialized knowledge and tools that go beyond a simple DIY scope. If you run into any of the following scenarios, calling a professional is the smartest move you can make.
- You Need to Run a New Wire: If you don't have a C-wire and an adapter kit won’t work for your setup, the only solution is to run a new thermostat cable through your walls. This job, known as "fishing" a wire, is complex. It's best left to electricians or HVAC pros who know how to navigate wall cavities without causing damage.
- You See Scorch Marks or Smell Burning: Any sign of burning, melting plastic, or scorch marks on the wiring, thermostat base, or near the HVAC control board is a serious electrical hazard. Turn off the power at the breaker immediately and do not use the system until it has been inspected by a professional.
- The System Blows Fuses Repeatedly: If you replace a fuse on your furnace control board and it blows again right away, you have an electrical short somewhere in the system. Don't keep popping in new fuses. A technician can trace the short to its source and repair it safely.
Attempting to solve deep electrical faults without proper training is never worth the risk. A licensed professional not only fixes the immediate problem but also ensures your entire system is operating safely and up to code. Finding the right person for the job is crucial, and understanding the qualities to look for in a great HVAC contractor will ensure you get a reliable and safe repair.
Common Questions We Hear About Nest Wiring
Even after getting the wires in place, a Nest thermostat can throw a few curveballs. Some of its behaviors and error messages can be confusing, especially if you're used to an old-school thermostat. Let's walk through some of the most common questions that pop up during installation and troubleshooting.
Why Does My Nest Thermostat Say “Delayed”?
Seeing a "delayed" message on your Nest is a classic symptom of a power problem. It's the thermostat's way of telling you its internal battery is running too low to safely turn on your HVAC system. It’s essentially putting a pause on everything to try and recharge itself first.
Nine times out of ten, this delay is caused by the lack of a consistent power source. This points directly back to a missing or improperly connected C-wire. Without that dedicated power line, the thermostat has to "steal" tiny sips of power from your heating and cooling cycles, and that method often just isn't enough to keep the battery topped off.
Do I Need a Jumper Wire for Rc and Rh?
Nope, you can toss that little thing out. The Nest Thermostat is smart enough to have an internal jumper that automatically bridges the connection between the Rc (power for cooling) and Rh (power for heat) terminals when it needs to.
If your old thermostat had a tiny metal staple or a short wire connecting these two terminals, make sure you remove it before installing your Nest. The Nest intelligently figures out if your system has one transformer for everything or two separate ones and handles the connection internally. Adding an external jumper will only confuse it and can lead to problems.
What Does a Blinking Red Light on My Nest Mean?
A blinking red light is the most critical low-power warning your Nest can give you. It means the battery is so completely drained that it doesn’t even have enough juice to power up the screen. You won't be able to do anything with it until it gets a significant charge.
A blinking red light is a clear signal that the thermostat's power-stealing efforts have failed completely. This is your cue to immediately investigate the C-wire connection or check for a tripped safety switch on your HVAC unit that has cut off all power.
This is often the end result of a long-term C-wire issue. However, it can also happen suddenly if a safety sensor on your furnace—like a condensate overflow switch or a high-limit switch—has tripped and cut the 24V power flowing to the thermostat.
My Nest Says the Wiring Is Correct, but Nothing Happens
This is easily one of the most frustrating nest thermostat wiring issues. The app gives you the all-clear, but your furnace or AC stays completely silent. When this happens, it's time to run through a quick checklist.
- Check the Physical Connections: Go back to the Nest base and give each wire a gentle tug. Is it pushed all the way in and securely seated? A slightly loose wire is a super common culprit.
- Verify the Breaker: Head over to your electrical panel and double-check that the circuit breaker for your furnace or air handler is switched fully to the "on" position. It's easy for them to get bumped or tripped.
- Inspect the HVAC Fuse: Open up the service panel on your indoor HVAC unit. You're looking for a small, car-style fuse on the control board—it's usually a 3-amp or 5-amp fuse. These can blow easily if wires accidentally touch during the installation.
If these steps lead you to a more complex electrical problem, or you're just not comfortable digging around in your HVAC system, don't hesitate to call for backup. The licensed technicians at Neighborhood Plumbing, HVAC, and Electrical are experts at diagnosing and safely fixing these exact issues. Contact us today and we'll get your system running perfectly.